Storing gas cylinders in the workplace is a critical issue for many sectors, including industry, logistics, production, maintenance and packaging. Poor management can lead to serious risks for people, buildings and goods. That is why it is essential to follow strict rules and adopt appropriate practices. At RIPACK, specialists in industrial shrink-wrapping solutions, we support […]
MAINTAIN YOUR SHRINK GUN
How do I maintain my Ripack shrink gun?
For each shrink gun there are regular maintenance and cleaning operations to be carried out in order to ensure that it works properly. These maintenance steps are common to each Ripack shrink gun.
Essential maintenance for the lifespan of your gun
However, in addition to cleaning your gun, there are some tasks to be done before each use. First of all, it is important to check that the hose is in good condition along its entire length, as well as at the connections. You will need to change the hose in the following situations:
- If you notice any cuts, even superficial ones
- Every 3 years, in the case of intensive use
- At the latest 5 years after commissioning (note that the date on the hose corresponds to the date of manufacture)
However, it is important to use only a replacement hose supplied by Ripack, with its original crimped fittings.
In addition, you will need to check the operation of the “dead man’s handle” by pulling the trigger and releasing it immediately. The combustion nozzle must go out instantly. If not, grease the gas valve.
There are also some operations you should be aware of when servicing your Ripack shrink gun.
Classic maintenance operations
The proper functioning of your gun will require good maintenance, as well as the performance of conventional maintenance operations. Changing the igniter, lubricating the valve sight or checking the Securipack are preventive maintenance operations, but important to know.
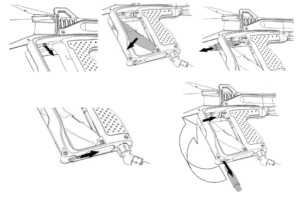
- Changing the piezo igniter on the Ripack 3000
A spare piezo igniter is supplied with each gun. You can change it, in a few seconds and without tools, so as not to block your activity. To do so:
-
- Lower the trigger
- Take out the old igniter
- The emergency piezo is located in the hand guard, which is accessible through the black hatch.
- Place the igniter at the trigger level and close it.

- Lubrication of the valve
If used in a very dusty environment, it is advisable to lubricate the piston of the gas valve, which can be accessed by tilting the trigger.
- Checking the Securipack
Every 500 hours of use, or at least every three months, it is important to check the correct operation of the hose rupture safety device by carrying out the following operations:
-
- Make sure you are outdoors, away from any ignition source, spark or anybody in ignition.
- Pressurize the unit
- Using the wrench provided, loosen the hose nipple nut and unscrew it completely until the gas is shut off.
The cleaning operations of your gun
- Cleaning the nozzle grille
To do this, you will need to do the following operations:
-
- Place the nozzle for a few minutes in a bath of dry petrol (e.g oil) so as not to damage the various sealing systems. Fatty products such as petrol should be avoided as they encourage impurities to adhere later. It is therefore important not to use any other degreasing product to clean your grille.
- Scrub the grille from the inside and outside with a hard brush or a paintbrush.
- Clean the receiving tube of the spark plug.
- Rinse again and blow with compressed air. Make sure to blow out the inside of the tube by intermittently closing the hole on the grille side.
- Reassemble the spark plug, taking care to push it into its housing until it clicks into place at the end of its travel. Incorrect positioning of the spark plug can cause damage to the electrical contact of the spark plug.
- Cleaning the venturi
The venture must be cleaned in dry condition. To do so, you should :
-
- Scrub the venturi with a brush or a hard brush
- Blow with compressed air in the injector/nozzle direction to avoid contamination of the injector.
- Perform a test run. If your gun has not regained full power, you will have to clean the injector.
- Cleaning the injector
In order to clean this part of your shrink gun, you will need to :
-
- Remove the shutter with a flat screwdriver.
- Using a suitable screwdriver, unlock the injector, remove it, rinse it with petrol and blow it out.
- Reassemble the injector after wiping off the seal mounted on it.
- Re-lock the injector without forcing it.
- Carefully screw the shutter back in place by screwing it in tightly, without forcing it.
- Perform a test run
- Seal maintenance
In order to maintain your joints, you will have to grease them with “Molykote 1102 gas cock Grease” or equivalent.
Now that the different steps for maintaining your gun are clear, it’s up to you. If, despite this, you notice any malfunctions on your shrink gun, you can send us an e-mail, explaining your situation, and we will answer you as soon as possible. Please note that you have a warranty service with your gun. If necessary, please contact us at info@sefmat.com.


